OK, now that we have gone through the refining process from 100 images to one, let’s have a go at producing an as-high-quality-as-possible file for this image (the trees). This will also allow us to use Ufraw and Cinepaint, as well as talking in more details about all the images operations involved in the process.
Opening Ufraw
Ufraw has just been released its 0.12 version – which is available for OpenSuse 10.3, but not for Ubuntu Gutsy (due to a couple of problems). So I fired my OpenSuse to take you through the process of developing a high-quality RAW file. Ufraw (web) has a very good manual webpage, well worth reading through.
On opening Ufraw, you are presented with a file manager that allows you to pick the file you want to work on. Click twice and behold:
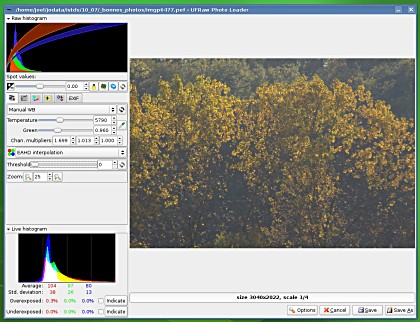
The main part of the screen is used to view your image. On the left pane are 2 histograms (one for the raw values on top, and the bottom one for your processed image values). Between the histograms are 6 tabs that allow you to set up the values for the RAW development and which we are going to review.
1st tab: White balance
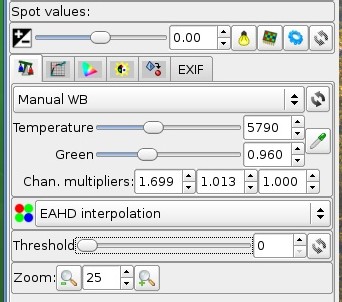
The first slider allows you to compensate the overall exposure of your picture. The little bulb defines how the highlights are recovered (LCH or HSV), the sensor icon defines the sensitometric curve used (sensor-like or film-like), the little dented wheel is for automatic value calculation and the last one (two arrows) puts settings back to default.
You then chose the white balance (camera, auto and a couple of predefinite ones, as well as manual). You can fine tune the white balance (blue-yellow axis, temperature) and the green-magenta one. The best way to go about it is to start way off in the blue and then move way off in the yellow and slowly move less and less way off until you find a point of balance. This is because our eyes are sensitive to variation (vs absolute values).
You can then chose the dematricing algorithm (since there have been PhDs written about that, I tend to leave it to the defaults and trust the guys who know better).
The treshold is actually a wavelet denoising intensity slider – good to have.
2nd tab: Basic Curves
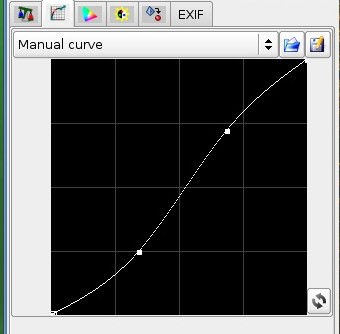
The second tab is for the “basic curves ajustment”. Since curves is by far my preferred way to interact with colors, I will give you a little blurb on the curves tool.
Basically, curves define how the color is modified along the histogram of an image. If you leave your curve as a straight 45° line, you don’t modify anything. If you bump it in the middle, you make the middle tones lighter. If you bump it near the bottom left, you make the dark tones lighter. If you bring it down a little bit near the top, you darken the highlights. So this gives you a lot of control about color corrections.
The curve I have here is the famous S curve that makes the dark tones darker and the light tones brighter: it augments the contrast of the overall image – that is logical: we are dealing with our trees, where I want the yellow foliage bright against a dark background.
Sliding the “departure point” of the curve along the bottom axis is equivalent to “black point” adjustment while sliding the “arrival point” on the top part of the curve square is equivalent to the “white point” adjustment.
So once you get used to using the curves tool, you very rarely need another color tool since it allows for so much flexibility.
3rd tab: Color Management
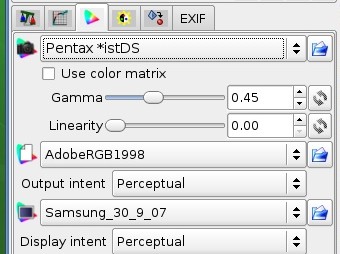
The next tab allows to chose an input profile (your camera profile), an ouput profile (AdobeRGB) and a monitor (display) profile. Basically, we are converting the RAW images from the camera profile to a TIFF image with AdobeRGB Editing profile (see this post for an overview of color management)
Gamma and linearity can stay to their default values. Ticking use color matrix boosts the image color (a bit too much in my taste) so I leave it off.
4th tab: Extra Curves
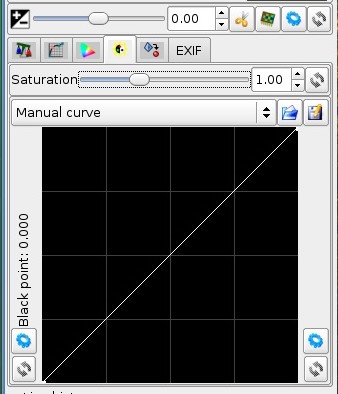
We have another opportunity to tweak curves. As far as I understand, the reason for two curves tool is to allow us to define a “sandard” curve for the Basic Curves and then to adjust it further here.
Think about having a standard “d-lightning” type in Basic Curves. It tries to make-do for the modest dynamic range of digital sensor coupled with the ugly blowing of highlights: you underexpose your image so the highlights don’t blow and then you boost the mid-dark tones. The limitation is that noise is prompt to appear in dark-boosted tones, but the new generation of CMOS sensors are doing better in that regard. So this could become a standard post-processing step – Nikon does it in camera for JPEG files…
I leave it to default here since I did my curve adjustment in the Basic Curve tool.
5th and 6th tabs: Cropping and orientation + Exif information
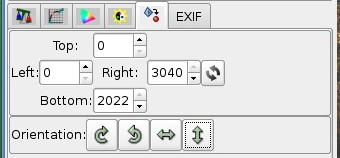
I don’t think I need to describe that in much detail…
The 6th tab just reports the image EXIF information.
Saving
On the bottom right of Ufraw, we find a “save as” button that allows us to decide to save a TIFF 16/bits channel, that allows us to keep the highest quality for our file. And down at the bottom is this little line:

which allows us to save the processing parameters of our image (ID file). So we can double click on that file and be back to where we left the file. Not only that, we can also use this profile combined with the ufraw-batch command line:
- to create a definite profile and use it for as many files as you want to process with that profile:
ufraw-batch --conf=IDFILE.ufraw myfile.pef
- to create a profile for each files and then do the conversion of each file with its profile, while you’re having a break (drinking coffee):
ufraw-batch *.ufraw
Final word
Ufraw has been around for quite a while in the Linux world and is becoming a very nice all-around RAW converter. I like the fact that it doesn’t try to imitate Lightroom or Aperture (we’ll get to talk about these later) but remains a very *nix-like application:
- fully usable from the command-line
- does only one job, but does it really well – it doesn’t try to be a viewer, web album creator, printer management software, RAW converter with a kitchen sink.
It is also fully color managed, allows for high quality 16bits/channel TIFF output and version 0.12 brings some very welcomed enhancements like denoising and orientation / cropping support. A very good tool.

openSUSE users can have a version of ufraw 0.12.1 WITH the scrolling (which the provided 0.12 version do not).
See:
http://download.opensuse.org/repositories/home:/hfiguiere/
one thing I don’t like about Ufraw is choosing files. There are no thumbs, so I have to open a browser window to find the image I want to work with.
I have been playing with Raw Tharapee, and so far it is looking quite good.
Hub: I am always proud to have “the crazy French” passing by. Your build repository looks full of photo treasures, that I am looking forward to experiment with.
Alan: indeed. thumbs would be nice. However, at that stage, we are only working on very few images so it is not as crucial. RawTherapee is nice and I will be talking about it someday… Thanks for passing by.
I’ve been trying out the various RAW processors available to Linux and I have to say Ufraw (current version 0.13) is safely the best one – RAW Studio is very young, RAW Therapee doesn’t work at all on my OpenSuse 10.3 64-bit setup, Digikam has a confusing interface, my camera software doesn’t work under Wine, and my copy of Photoshop CS under Wine isn’t sufficiently up-to-date to import RAW. It almost won by default…
For those willing to pay, Bibble is currently the only non-free competitor.
Ufraw works very well with the default sRGB import profile (auto-exposure is excellent), at the cost of a more limited colourspace – I’m still working out the best results using a aRGB profile specific to my camera (Sony A100).
For those that would like thumbs and use GNOME, I have a suggestion – catalog your RAW files with F-spot, and then right-click on those thumbs to open in Ufraw. It’ll even create a newer version of the file to avoid corrupting the original. From there, you can export for final sharpening and PP in Gimp, Cinepaint or even Photoshop for final sharpening.
Hi Colin,
Nice to hear from you again. My take is also a mix between batch UFraw and “detailed” UFraw, although I have high hopes for RawStudio (regularely compiling / patching CVS). The final processing in Gimp or Cinepaint is a must (sharpening and local masking).
I get thumbs for my .PEF (Pentax) files in Nautilus by default – I haven’t done anything special to get them, it seems…
Thanks for your comment & take care,
Joel
Hi,
I have just a comment to the section about curves. I dont understand
the image processing well, but it is obvious, that changing the second
curve has very different effect compared to the first curve. Probably
the first (base) curve is applied to each channel in rgb space (?) and
the second one is, according to the user guide, applied to the
luminosity channel in Lch space. The luminosity curve is very useful
and it is not straightforward to simulate in the GIMP.
Stepan
Hi,
nUFRaw is the new UFRaw. Have a look here:
https://sourceforge.net/projects/nufraw