Now you have 2, 3 or more images that should fit together, you need to actually do the stitching. In Linux, Hugin Panorama Photo Stitcher (web, wiki) is the tool that allows you to do just that (it works with Windows and Mac OS too, by the way). For general panoramic photography, PanoTools wiki offers a wealth of useful information.
Foreword
Before diving into Hugin, let’s just say that stitching pictures together is a very complex task: besides fitting images together, you need to take into account lenses defaults (distortion and vignetting), questions of projection and blending the different images. There is a lot of high flying maths going on there, much more than I can understand or explain. So as always, I am experimenting until I find settings that give me a good result and sharing my experience – even if I don’t understand all that goes behind the scene. The proof is in the pudding.
Adding pictures
By default, Hugin offers a simplified assistant view, that guides you step by step into doing a panorama. I had a few bad experiences with it (especially when choosing control points that takes for ever and the end result was way off), so I skip that and do it by hand, like a real man… So the second tab is “Images”, where you chose the images you want to stitch together:

In there, you can add as many images as you need and order them (move up / down). The image orientation will be processed automatically at the optimize step and I find it easier (and quicker) to add control points myself than have it done automatically. The Anchor this image for position / exposure allows to chose the current image as reference for position / exposure – specially useful if you are stitching 3 (or more) images: you can pick one in the middle for position and an average exposed one for exposition.
Camera and lenses
This part you usually don’t want to touch by hand. It basically gets information about the focal length and lens typed used for the pictures – Hugin loads what it needs from the EXIF information (by defaults) and does a good job out of it. It is possible to have more detailed information about the lens used (distortion, vignetting) either generated at the optimize step or on a “file per lens” basis (which I don’t know how to use).
Crop
I don’t use crop at that stage – I tend to have the panorama processed in Hugin and do the cropping at a later stage.
Control Points
Although there is a way to automatically add control points (ie the points that are the same on the two pictures you want to stitch together), I find it easier to do by hand. Basically I find the automated way very slow (there is a lot of computation involved) and sometimes giving hazardous results. Here is what the tab looks like:

You just need to add a few points more or less evenly spread over the pictures overlap. The auto fine-tune option (enabled by default) calculates the exact positioning of your points – so creating these control points is really a matter of a couple of minutes.
Now is a good time to save your settings for the current panorama in a .pto file…
Optimizer
Another tab where Hugin knows very well how to do the right thing by default. You can safely click on “Optimize now” and be done with it. There is a drop down menu that gives finer optimization options (the more down the menu, the more optimization) – including lenses optimization. Here are the values I get for optimizing this panorama: 9.35 average control point distance, 12.64 standard deviation, 14.48 maximum. If you have something like 350 somewhere, expect trouble.
Panorama preview
At that stage, it is a good idea to have a preview at your panorama – mainly to see that nothing went wrong so far and before launching the final (and long) calculations. Clicking on the (top bar) preview icon gives you the following dialog:

Basically, this is what it looks when everything is fine. At the bottom you can chose your projection type (check which one you like best) – the blend mode allows you to see how much intensity difference there is in the overlap.
Stitcher
In this last tab of the main window, you just ask Hugin to process your image:
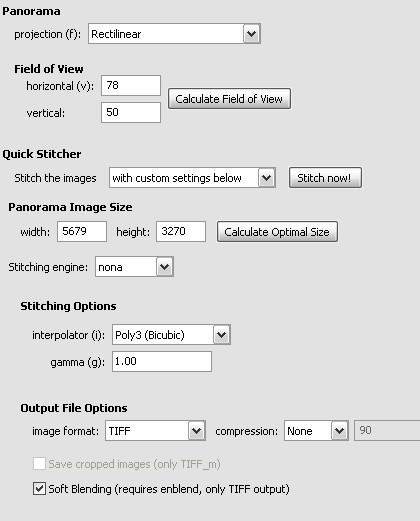
So chose your favorite projection (from the panorama preview step) and have Hugin calculate the field of view and optimal size (beware, panoramas can get huuuuuge). The default stitching engine and interpolation should be fine. Pick a non-compressed TIFF output and tick Soft Blending for optimal color blending between your images. You can then hit Stitch now! with custom settings below, chose your output file and relax while it is being processed.
Final touch up
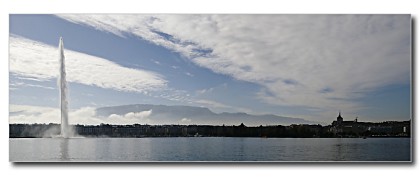
Hugin spits out a huge TIFF (8bits / channel) file, usually with a lot of empty (transparent) space around the image (that has a somewhat irregular shape). So fire Cinepaint, crop your file to a rectangle, convert it to 16 bits / channel and start a standard post-processing session…
I have already put that picture somewhere, but in case you wonder, here is the final result (clicking on it will redirect you to a bigger version in my gallery site):

On my video podcast http://meetthegimp.org I just published a video about Hugin made by Joseph, one of my viewers. I think this well written text and the video can work together well.
I’ll follow your blog closely from now on. I found it on a page which linked to you and me and think it’s very informative and well made.
Rolf
Hi Rolf,
Thanks for your comment. I have added meetthegimp.org in the links page.
Take care,
Joel
In the final image you posted there is a distinct light/dark difference between the left and right side of the image. I’ve found I can often fix that by hand-adjusting the per-picture color parameters in Hugin.
Just downloaded it. Am impressed, really, really impressed. I’ve spent ages (more than 10hours I’d say) in GIMP trying to do this manually! Hugin just did it by itself, took me about 20mins to stitch 6 poorly aligned and differently exposed images into one panorama.
I just could not leave your web site prior to suggesting that I extremely enjoyed the standard information a person provide in your guests? Is gonna be again often to investigate cross-check new posts