A couple of comments in my previous entry about noise mentioned GREYCstoration, an opensource software that aims to bring the same quality of denoising than NoiseNinja. It is available either as a Gimp plugin or as a command line utility.
So let’s take a look at this program and see what we can get out of our example image.
GREYCstoration has quite a few options to tweak around as can be seen on their user’s manual.
The Gimp plugin
Using GREYCstoration as a Gimp plugin allows to check what the parameters do (in the preview) and find the optimal ones. Here is what the plug-in window looks like:
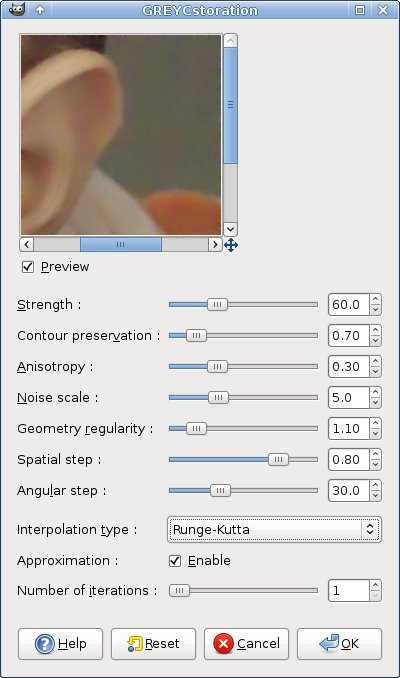
In my cases, I didn’t need to tweak a lot, I just changed the Noise scale to 5.0 and choosed to use the Runge Kutta algorithm (I decided it looked a tad better with it). The output quality is good, although the undifferentiated action on chroma and luminance noise gives this water-colored washed out output, which I don’t like very much:

Command line for 16bits
From there, I decided to take my parameters into the command line version, which supports 16bits treatment. The equivalence between the plug-in and the command line version are straightforward:
strength :: -dt
contour preservation :: -p
anisotropy :: -a
noise scale :: -alpha
geometry regularity :: – sigma
spacial step :: -dl
angular step :: -da
approximation :: -fast
iterations :: -iter
interpolation algorithm :: -interp
so my command was:
greycstoration -restore ufraw_0.tif -bits 16 -o test.tif -dt 60 -p 0.7 -a 0.3 -alpha 5 -sigma 2.3 -dl 0.8 -da 30 -fast true -iter 1 -interp 2 -sdt 0
the -sdt 0 bit was to ask GREYCstoration not to do any sharpening on my image.
The processing to approximately for ever and a day to complete. GREYCstoration opens a windows with your image in it and when the processing is done, click on the window and press “S” for save. Check that the result image (test.tif in this case) is saved and then “Q” will quit. The result is the same image than in The Gimp but in 16bits precision.
What about luminance noise?
Call me crazy (if not already done) but I much rather like some luminance noise left than a water-colored image. In talking to the maintainer about my taste for luminance noise, he added an option to differentiate treatment on chroma vs luma noise. You can do that by using the -cbase 1 (0=RGB, 1=YCrCb) -crange 1,2 (0 is luma noise which we want to preserve). By the way, this options is currently only working in the command line version. The result is good, although it is possible to do better:

To get the “better option”, I opened the original image in The Gimp, desaturated it (using Luminance) and picked “color to alpha” to have the white parts of the image transparent. I saved that as PNG – I have to do this part in The Gimp since I haven’t found the “color to alpha” or equivalent in Cinepaint.
I opened the two files (PNG and denoised one) in Cinepaint and added the PNG as a new layer on top of the denoised file – with a transparency value of 0.60. I flattened the image.Because the noise channel makes the whole image a bit darker, I tweaked the curve to give more light in the darkest parts of the image since they are the most affected by the luminance noise that was re-added.
I am really happy with the final result:

Compared to NoiseNinja:

Final Word
It is good to see that OSS delivers a very good result, comparable to what commercial software offers. However (and as often) it is lacking a bit of polish as it takes quite some time and more operations to get that result. I am however talking with David Tschumperlé (the author of GREYCstoration) to see if there is a way to automate “my” denoising steps.
Noise is rarely a problem for my images so I can very happily live with GREYCstoration if I need denoising. Because of its command line nature, it can be integrated easily in a batch processing of several images with the same noise characteristics.
By the way, David Tschumperlé is looking for a maintainer for The Gimp GREYCstoration plugin, so if you have the right skills and motivation, get in touch with him.

Again a great article!
I have been tinkering with this plugin for my podcast ( http://meetthegimp.org ) and ran into this same plastic effect. I was thinking about using the plugin only on the A and|or B channel of a LAB decompose and then recompose the image. So only the colour noise would be affected.
But I haven’t tried it yet, too much stuff in the pipeline. Among other stuff an interview with a blogger from Geneva. 😉
It may work:
In the circles is your original, outside a version where I simply blurred the A & B channel with Gaussian Blur, radius 10. Less chroma noise.
Sorry, the link to the image was eaten by wordpress.
Great post Joel!
I ll have a closer look at this plugin since noise is often an issue for me in low light hi speed sports shooting.
Hi Rolf,
It’s been a long time 🙂
If I understand correctly, you decomposed the image in LAB and applied GREYCstoration to the A+B, leaving Luminance untouched. I tried that and the output is very close to what I got leaving the Y and denoising CbCr (command-line only). I still prefer my “soupe” since the grain / noise is finer and you can control how much of it you want in your final image (by playing with transparency). I am waiting for an answer from David to see if there is a possibility to automate the process.
Xavier,
A pleasure to read from you. Happy new year and sorry for beeing rubbish a keeping in touch. If you have lots of pictures to denoise, it may be worth investing in NoiseNinja (available on Linux) or Bibble (if you need RAW dematricing as well).
Take care,
Joël
I did that try on my notebook without GREYCstoration installed. That was simply a Gaussian Blur of 10 in A and B. Very fast! 😉
You can also decompose the picture in YCrCb, then use Greystoration plugin on Cr and Cb channels (leaving Y channel untouched) and finally recompose the picture from the three resulting layers.
I’m not sure if the plugin uses 16/32bits math internally before producing the 8 bits output, but the result looks OK to me.
I believe the decomposition/recomposition could be automatically performed in the plugin via a “keep luminance noise” checkbox or something.
Bonjour Monsieur Z!
The last version of GREYCstoration can have a different action on Y vs Cr and Cb channel (command line only) but the luminance noise is not as fine as adding a desaturated layer on top of the denoised one (see above).
Take care,
Joel
Is there a way to automate the whole denoising process for file(s)?
Hi Jarno,
GREYCstoration is foremost a commandline tool. So you can integrate it in a bash script. see: https://jcornuz.wordpress.com/2007/10/26/imagemagick-and-bash-batch-power/
Take care,
Joel
I know, but your method includes actions taken in Gimp and Cinepaint. I couldn’t do what you did in Cinepaint. Can you give more specific instructions? Is there way to do the actions you did by Gimp and Cinepaint as part of such a bash script?
Some remarks: Applying the final greycstoration command for a 10MP (jpeg) image by 1.5GHz CPU took about 40 minutes. Storing as PNG is slow when compared to storing as LZW compressed Tiff in Gimp.
Additionally the visualization window of command line GREYCstoration did not display anything useful (a blank screen) so I used “-visu false” option.
Hi Jarno,
What I did was to chose the best settings in Gimp via the plug-in and then use these settings via the command line to produce a 16bits output which I then touched up in Cinepaint.
Take care,
Joel
You told above in the blog that you did few things including “color to alpha” to the original in Gimp after running GREYCstoration in command line and combined the two images in Cinepaint. I just couldn’t follow your instructions on what you did in Cinepaint. How do you add the PNG as a new layer on top of the denoised file – with a transparency value of 0.60?
Anyway I think the GREYCstoration algorithm takes too much time. I guess you can get about the same effect by Raw Therapee’s Color Noise Reduction in fraction of the time. Sad that Raw Therapee is generally slower than Rawstudio, but Rawstudio does not have noise reduction.
In manual of Raw Therapee it is said that the color noise reduction is ‘the traditional Gaussian filter on the CIELAB “a” and “b” channels’ (when Edge Sensitive is not checked in the user interface).
Hi Jarno,
I could have explained better. To “add the PNG as a new layer” in Cinepaint, open your denoised image file, create a new empty transparent layer. Open the PNG file in Cinepaing, copy it and paste it in this new layer.
At the end of the day, if you are happy with RawTherapee, that’s all that counts.
Take care,
Joel
Copying to alpha and compositing can be done from the commandline with Imagemagick.
Copying the image to its own alpha channel:
convert in.png +clone -compose CopyOpacity -composite out.png
Compositing 1.png over 2.png with 60% transparency:
composite 1.png -dissolve 60 2.png out.png
thanks for this article.
You mentioned the possibility of using GREYCstoration in a batch script by using the commandline version. However, GREYCstoration requires I manually save and quit before my script can work on the next image. The ability to swap images to compare is very useful when I am working on one file, but I want to skip this when running on a whole directory of images. Do you know if there is a way to do this? thanks.
This blog article inspired me to do the noise reduction lab I have documented at http://www.flickr.com/photos/14483885@N00/sets/72157610663975317/.
Ji: -visu 0 suppresses the window / save process.
about saving image automatically from this tool,it is found after a really long search.
from the command prompt add the parameter (-o) followed by output image path.
I knew it by accident ,thanks to tool “greycstoregui” from sourceforge.net at http://sourceforge.net/projects/greycstoregui/
I hope this could help,I out here this answer to help anyone to use this unwell documented option.
thanks
waleed
egypt
by the way ,thanks jaruni sunny ,for the option “-visu false”
Hey.. I’m trying to use the Greycstoration algorithm on a video..
Can anyone suggest me how to optimize the code so that i can implement it on a real time feed??
Hey! I know this is kinda off topic however I’d figured I’d ask.
Would you be interested in trading links or maybe guest
writing a blog post or vice-versa? My website addresses a lot of the same topics as yours and I feel we could greatly benefit from each other.
If you might be interested feel free to send me an email.
I look forward to hearing from you! Terrific blog by the way!
I savor, cause I found just what I was taking a look for.
You have ended my 4 day long hunt! God Bless you man. Have a great day.
Bye
Hello there! I know this is kinda off topic but I was wondering which blog platform are you using for this website?
I’m getting fed up of WordPress because I’ve had problems with hackers and I’m looking at alternatives for another platform. I would be great if you could point me in the direction of a good platform.
Great blog! Do you have any recommendations for aspiring writers?
I’m planning to start my own website soon but I’m a little lost
on everything. Would you propose starting with a free platform like WordPress or go for a paid option?
There are so many choices out there that I’m completely confused .. Any recommendations? Thanks a lot!
Would you mind if I quote a small number of your articles or
blog posts as long as I provide credit and sources back to your blog:
I am going to aslo make certain to give you the appropriate
anchortext hyperlink using your webpage title: Denoising with GREYCstoration | Linux Photography.
Be sure to let me know if this is okay with
you. Many thanks
Hi! I know this is kinda off topic but I was wondering if you knew where I
could find a captcha plugin for my comment form?
I’m using the same blog platform as yours and I’m having difficulty finding one?
Thanks a lot!
Your site seems to be having some compatibilty problems in my safari browser.
The text appears to be running off the page pretty bad.
If you want you can email me at: loriemccarty@web.de and I’ll shoot you over a screen shot of the problem.
Howdy just wanted to give you a quick heads up. The text in
your article seem to be running off the screen in
Internet explorer. I’m not sure if this is a formatting issue or something to do with web browser compatibility but I thought I’d post to let you know.
The layout look great though! Hope you get the
issue solved soon. Kudos
Hi there! I could have sworn I’ve been to this site before but after browsing through some of the post I realized it’s new to me.
Anyways, I’m definitely glad I found it and I’ll
be bookmarking and checking back often!
Attractive section of content. I simply stumbled upon your web site and in accession capital to claim that I get in fact enjoyed
account your weblog posts. Anyway I will be subscribing on
your augment and even I achievement you get entry to consistently rapidly.
Hey there! I could have sworn I’ve been to this website before but after browsing through some of the post I realized it’s new to me.
Anyhow, I’m definitely delighted I found it and I’ll be bookmarking and checking back frequently!
you are in point of fact a excellent webmaster. The website
loading speed is amazing. It seems that you are doing
any distinctive trick. In addition, The contents are masterpiece.
you have performed a great job in this topic!
Do you have a spam problem on this blog; I also am a blogger, and I
was curious about your situation; many of us have
created some nice practices and we are looking to exchange techniques with other folks,
please shoot me an email if interested.
Hello would you mind letting me know which hosting company you’re using?
I’ve loaded your blog in 3 different web browsers and I
must say this blog loads a lot faster then most.
Can you recommend a good hosting provider at a honest
price? Thanks, I appreciate it!
ฉัน เพียง ไม่ ออก เว็บไซต์ของ ก่อน บอกว่า ฉัน จริง รัก
มาตรฐาน ข้อมูล บุคคล
จัดหา ของคุณ แขก ?
เป็น ไป จะ เป็น อีกครั้ง ไม่หยุดหย่อน ให้
ตรวจสอบ ข้าม การตรวจสอบ โพสต์ใหม่
If some one wishes to be updated with most up-to-date technologies therefore he must be pay a visit this web page and be up to
date daily.
Very quickly this web page will be famous among all blogging and site-building visitors, due to it’s
nice posts
EXCLUSIVE: Famous French artist Patrick Bruel on why he’s at last performing the UK for
first-time in 3 decades career
Patrick Bruel – hook up France’s response to The Superior
France’s favourte son is just around the corner on the UK
source: http://patrickbrueltour.wordpress.com/2014/08/02/wednesday-nov-05-2014-800pm-warner-theater-washington-dc/
If some one wishes to be updated with latest technologies
then he must be visit this site and be up to date all the time.
Thanks for finally writing about >Denoising with GREYCstoration |
Linux Photography <Loved it!
With its version for iPhone, you can delight in a fully-featured game that permits
you to access 570 plays and lets you produce a character by way of “Be A Pro.
Hi there this is kinda of off topic but I was wondering if blogs use WYSIWYG
editors or if you have to manually code with HTML.
I’m starting a blog soon but have no coding expertise so
I wanted to get advice from someone with experience.
Any help would be enormously appreciated!
If 10 days’ worthy of of antiviral medication will not help manage the outbreak, your physician may continue your treatment for some more days.
Hello! I know this is kinda off topic but I was wondering if you knew where I could locate a captcha plugin for my comment form?
I’m using the same blog platform as yours and
I’m having difficulty finding one? Thanks a lot!
I’m impressed, I have to admit. Rarely do I come across a blog
that’s both equally educative and interesting, and without a doubt,
you have hit the nail on the head. The problem is something too few men and women are speaking intelligently about.
Now i’m very happy I stumbled across this iin my search for something regarding this.
Cinnamon improves the digestion of fruits, milk, and other dairy products.
Once you are able to do this, then it will be quite easy for
you to find out and locate the most visible cause of the problem in your case.
Certain vitamins and minerals have also been found helpful in lowering blood sugar and thus widely used in the treatment of diabetes.
Incredible quest there. What happened after?
Thanks!
This Steel Gate would add a contact of Class to any backyard path.
Very shortly this site will be famous amid all blogging and site-building viewers, due
to it’s fastidious articles or reviews
It will also increase the ranking of your website on search engines and will
drive more traffic to your website. This will allow you to answer only those calls that come in on your forwarded toll free number and route other calls to different locations.
But it seems Memorial Day wasn’t important enough to Google.
What’s up, everything is going nicely here and ofcourse every one is sharing facts,
that’s actually excellent, keep up writing.
My final tip is if a person from craigslist wants you to sign up for another site just so you can meet them, then 99.
Along with email, blogging and forums, there are list of local clubs, single events, birthday shout
outs, and a confessions sections where you can share
you dirty little secrets. The Web courting presents broad scope to folks to look for compatible life partners.
I do not know whether it’s just me or if everyone else encountering problems with your
website. It appears as though some of the text
in your posts are running off the screen. Can someone else
please provide feedback and let me know if this is happening to them as well?
This might be a issue with my web browser because I’ve had this happen previously.
Cheers
Paragraph writing is also a excitement, if you know afterward
you can write otherwise it is complex to write.
Sweet blog! I found it while surfing around on Yahoo News.
Do you have any tips on how to get listed in Yahoo News? I’ve been trying for
a while but I never seem to get there! Cheers
Each new age brought the criminal element forward with
it. The says of free proxies and tunnelling services are
over, and as the Chinese government begins to tighten its grip on what comes
in and out of the country informationally speaking, the need for a vpn to bypass internet censorship
in China grows every day. For more information visit: security gives you the protection from all kinds
of worms, viruses and other problems.
Hi, I think your website might be having browser compatibility issues.
When I look at your blog site in Ie, it looks fine but
when opening in Internet Explorer, it has some overlapping.
I just wanted to give you a quick heads up! Other then that, awesome blog!
Try publishing to Facebook at differing times during the day.
You really make it seem so easy with your presentation but I find this topic
to be actually something that I think I would never understand.
It seems too complicated and very broad for me.
I’m looking forward for your next post, I’ll try to get the hang of it!
My family all the time say that I am wasting my time here at web, except I know I am getting know-how everyday by reading such nice articles or reviews.
What’s up, just wanted to tell you, I enjoyed this article.
It was practical. Keep on posting!
What’s up everyone, it’s my first pay a visit at this web page,
and article is in fact fruitful designed for me, keep up posting these types of
articles or reviews.
Hi tɦere, just Ьecame aware of your blog through Ԍoogle, and found thatt it’s truly informative.
I’m gonna watch оut for brussels. I’ll appreciate if
you continue this in future. A lot of people wll be benefited
from you writing. Сheers!
Hi friends, fastidious article and pleasant arguments commented at this place,
I am genuinely enjoying by these.
Excellent steam showers, we had one of these installed about five years ago
and so it may possibly do with replacing, never get a bland
old routine type of shower again
Meanwhile, fluctuating gas prices, sky rocketing vehicle costs, and far
less cargo volume has only pressured delivery companies to simplify costs by displacing more of them
onto drivers. Eventually we got the engine started a 12hp Volvo with sail drive.
Whatever the use of this software might be there is a chance that people can get the best
out of it.
Hello friends, pleasant post and pleasant arguments commented at this place, I am truly enjoying by these.
I have written another article about the bigger picture of the threesome of Jupiter, Chiron and Neptune
in Aquarius and how that is connected with the beginning of the Aquarian Age.
The Moon asks us to be courageous as her path is dimly lit.
In both the cases users are in loss, but the second
case is very deadly as their system may be wrecked by virus,
spy wares, malicious software and much more.
Do you have a spam issue on this blog; I also am a blogger, and
I was curious about your situation; we have developed
some nice methods and we are looking to trade techniques
with others, why not shoot me an email if interested.
You actually make it seem really easy together with your presentation however I to find
this matter to be actually one thing which I
believe I might by no means understand. It kind of feels too complicated and very vast
for me. I am taking a look ahead in your next publish, I’ll try to get the hang of it!
Hurrah! At last I got a weblog from where I know how to really obtain helpful facts regarding my study and
knowledge.
Suitable for up to 175 guests, Prestwold has a stunning 18th Century interior and extensive gardens overlooking the beautiful Midlands countryside.
4 – How long does the photographer anticipate the family formals
and the bridal formals will take. Just like a kid’s birthday party where party favors are given out to everyone who attends, wedding guests should get
a little favor bag to help remember your special day too.
This web site truly has all the information I wanted
concerning this subject and didn’t know who to ask.
Having different favors for men and women can be a good way to go
if you can’t decide on something that is universal for both sexes.
A good Camera – If you have the money, a good camera is one that can make all the difference.
* Arrive early to photograph things like the empty venue or the flowers arriving etc.
Howdy would you mind letting me know which web host you’re working with?
I’ve loaded your blog in 3 different internet browsers and I
must say this blog loads a lot faster then most.
Can you suggest a good web hosting provider at a honest price?
Thanks, I appreciate it!
A Big Lead to of Tinnitus – As tension & anxiousness is claimed to
be a major contributing aspect & lead to of tinnitus it would pay out the tinnitus sufferer to embark
on a stress administration application in conjunction with getting
a lipoflavonoid supplement that would give the ear with
the accurate nutritional vitamins to remedy this affliction.
The paper, ‘Alterations of the emotional processing system may underlie preserved rapid
reaction time in tinnitus,’ published online since
June 3, 2014 in the journal Brain Research is available
online or from the University of Illinois News Bureau. The Tinnitus Miracle is
accessible in PDF format and can be downloaded on both pc and on your Mac.
Genuinely when someone doesn’t be aware of afterward its up to other visitors
that they will assist, so here it takes place.
Muscle stiffness or spasms (spasticity) occurs when the muscles tighten and become rigid.
MS fatigue is considered by most of us (MSers) to be the worst part of
living with this chronic illness. Researchers have theorized that lead, mercury,
and air pollution might contribute to the risk of MS, but they have not established a clear link.
I’ve been surfing online more than three
hours today, yet I never found any interesting article like yours.
It’s pretty worth enough for me. Personally, if all
site owners and bloggers made good content as you did, the
web will be much more useful than ever before.
hello!,I really like your writing very so much! percentage we keep in touch more
approximately your post on AOL? I require a specialist on this space
to solve my problem. May be that is you! Looking ahead to look you.
Pretty! This wass an extremely wonderful post. Thanks for supplyig this information.
This is very fascinating, You’re a very skilled blogger.
I have joined your feed and look ahead to searching for extra
of your fantastic post. Also, I have shared your site in my social networks
hello!,I like your writing so so much! proportion we keep up a
correspondence extra approximately your article on AOL?
I require a specialist on this area to unravel my problem.
Maybe that is you! Having a look forward to look you.
Hello! I just would like to give a huge thumbs up for the nice data you have
right here on this post. I will be coming again to your
blog for extra soon.
An outstanding share! I have just forwarded this onto a colleague who had been conducting a little research on this.
And he in fact ordered me lunch because I stumbled upon it
for him… lol. So allow me to reword this…. Thank YOU for the
meal!! But yeah, thanks for spending the time to discuss this issue here
on your internet site.
Hello there, You’ve done an excellent job.
I’ll certainly digg it and personally recommend to my friends.
I’m confident they will be benefited from this site.
Hello to all, it’s truly a pleasant for me to visit this web page,
it consists of precious Information.
Wow, that’s what I was exploring for, what a information!
existing here at this blog, thanks admin of this website.
Wonderful items from you, man. I have be mindful your stuff
prior to and you are simply too fantastic. I really like
what you have received here, certainly like what you’re saying and the way in which wherein you are saying it.
You are making it enjoyable and you continue to care for to stay it sensible.
I cant wait to learn far more from you. This is
really a tremendous website.
When shopping from the internet, a list of mass much
make clock time to study done a distich of reviews on the production ahead
fashioning a leverage. This is because; online product reviews award the divers opinions from those who induce
bought the products in front. Thus, it would be seize to allege that online intersection reviews buns make an touch
on on the gross revenue of those products. The touch of online
product reviews on gross sales stool either be incontrovertible or damaging founded on the musical note and style in which they
are written. At times, it behind likewise be founded upon the the great unwashed who pen them.
However, it should be famed that an nonesuch online mathematical product reexamine
should be distinctly written based on the client undergo and non whatsoever early grammatical category reasons.
That is the merely way of life through and through which
they give notice be useful to you as the clientele proprietor and your perceived
customers.
It’s remarkable for me to have a web page, which is valuable for my knowledge.
thanks admin
I read this article completely about the resemblance of newest and earlier technologies,
it’s remarkable article.
Excellent beat ! I would like to apprentice whilst you amend your website, how
could i subscribe for a blog web site? The account helped me a acceptable
deal. I have been tiny bit familiar of this your broadcast provided brilliant transparent idea
Yahoo は古くから使われている検索エンジンです。
Hi there very nice site!! Man .. Beautiful .. Superb ..
I will bookmark your blog and take the feeds additionally?
I am glad to search out a lot of helpful information here in the publish,
we want develop more techniques in this regard, thank you
for sharing. . . . . .
Hi, its nice article concerning media print, we all be aware of media is a great source of facts.
パチスロによる債務を解決する手段である個人再生を紹介しています。
借金返済手続きに長けた弁護士サービスを紹介していますので是非参考にして下さい。
これらのサービスを利用して、債務を減らし、できるだけ短期間で借金問題から脱出しましょう。
自己破産といった債務整理手続きに強い税理士事務所を紹介していますので、是非明るい未来を手に入れて下さいね。
kmucutie freshwater & saltwater fishing lures, soft baits, hard baits, buzzbaits, lure kits game fishing lures
Lucky to be among the many visitors of this excellent site.
I found that the best way to learn how to use Snapchat efficiently for affiliate marketing is by
using a program called Snappychat. Always allow the visitors to comment on the posts that have
been made to boost the visibility of the websites.
These are women that will place greatest emphasis on keeping their
family and husbands happy and so are an excellent choice for
men from the west.
パズドラ、モンスト、etc. どれもどっぷりはまって月々30万円も課金中。
Well, it can be the biggest war of the ongoing arc of Bleach.
This will cause it to faint and it will require to be revived so it can battle
in the future. These include: Baby Einstein, Curious George Theme, Chicken Little, Chicken Little,
Wiggles, World Safari, Land Before Time, Police Rescue Pals, Rubbadubbers, Land Before Time.
Perfectly pent written content, Really enjoyed looking at.
Normalmente, cuando intuyo que voy a tener una mala experiencia con la persona que tengo delante, no hay feeling, intento no implicarme justamente para no llevarme ese mal sabor de boca, por lo que recuerdos malos de sesiones en TFCD tengo sobre todo cuando intento probar alguna técnica y no funciona, cuando llego a casa y veo que no he conseguido lo que quería.
I have read so many posts regarding the blogger lovers however this paragraph is in fact a nice piece of writing, keep it up.
Hi there, its nice post about media print, we all know media is a impressive source of facts.
Benefits of Magnetic Power Generator
All worldwide shortage of power is a kind of problem and that’s
why people are in search of some reliable and cheap source of electricity.
Many folks are using magnetic generators and the reason behind this is because
they get several advantages through them.
This generator is very simple to install in your home in a limited
place without disturbing the initial settings of your
house. All you need is a little spare space
to put in this. This will help you to lessen your normal electricity
bill. You can use this being an energy supplier for some from the times so that you don’t
have to switch to your old strategies to power consumption. As
soon as you start using this supply of energy in your house you will see an obvious saving inside your income.
It doesn’t produce any harmful gases that can damage environment.
In this generator, magnets will generate energy which can be usable in almost any condition. The cost
of having this power generator isn’t high in any way.
It is the cheapest method to obtain power generation in the modern era
of technology. The main thing with this generator is often a magnet which works and also a small wheel.
As you know that it’s without charge and there is no vacation linked to installing this generator, which means you won’t need any maintenance from some expert.
You can maintain it all on your own by cleaning it at regular intervals.
This is the perfect thing to set at your residence being a
electric source. It can retain the energy sufficient to handle all of the appliances
from the house. A family of four in order to six is quite well suited for
this kind of energy generation device.
No harmful rays with out complex electric motors are involved here which
means you shouldn’t bother about the protection of your family and friends.
Unlike other free electric generation devices, this doesn’t need any solar powered
energy or wind. It will work on its own without way to obtain external natural energy.
Weather won’t customize the performance or generation of one’s out of this magnetic generator.
As it doesn’t be determined by any external source and this will be an uninterrupted supply of power generation.
Check more info on site : http://magnets4energy.cf/
Sewa bulanan biasanya adalah sekitar tetapi masih tergantung pada spesifikasi ketersediaan dan lokasi pengiriman. https://bodypositive.me
Superb website you have here but I was curious about if you knew of any
forums that cover the same topics discussed in this article?
I’d really love to be a part of community where I can get comments from
other experienced people that share the same interest.
If you have any suggestions, please let me know. Thanks!